Creating an Agent Script
Create agent scripts as part of the flow design process for the flow that the script should be used with. The script is designed using the Script flow object which includes a script editor. You can insert the Script object into the Resource portion of the flow to run when the agent is conferenced into the conversation.

|
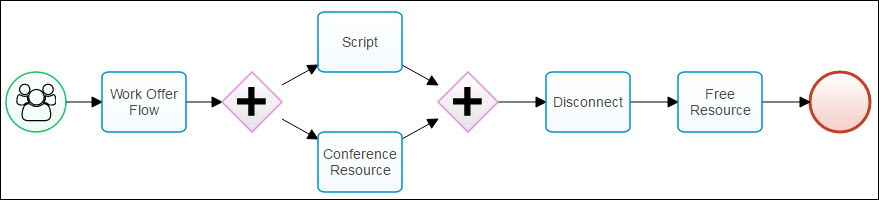
The Script feature is not included in the default Resource Flow notation, which is a single object used to send a work offer to an agent and conference them into a conversation. Scripts can be sent any time between the work-accepted signal and the resource-disconnect signal. You can build the resource flow out instead of using the Resource Flow notation to include the Script notation (as with the script example in the following To create an agent script steps) or you can use it in addition to the Resource notation as is demonstrated in the example directly below.
In this example, the flow sends a script ( |
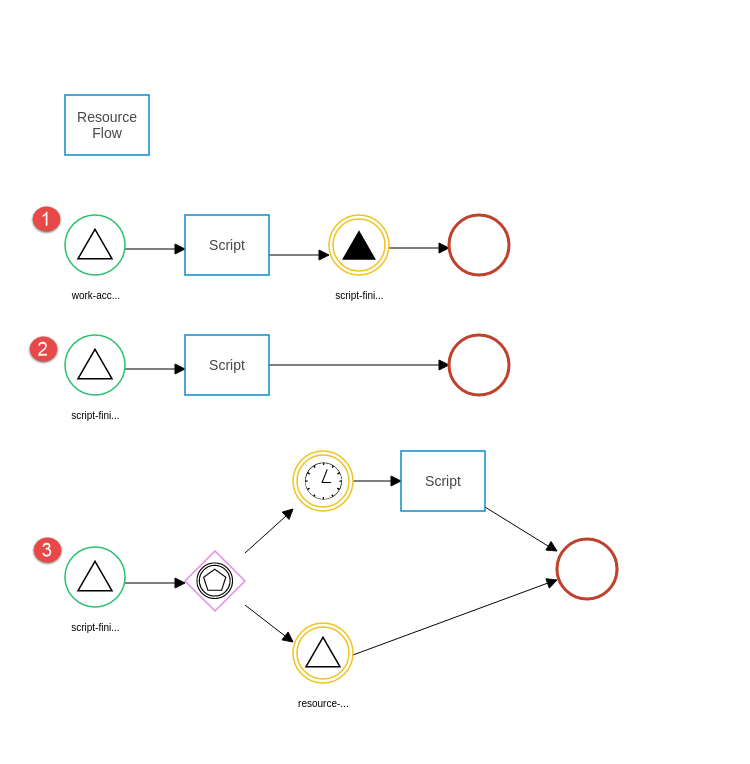
 ) when the agent has accepted the work offer. The second script (
 ) is sent after the first script is submitted. Finally, a third script (
 ) is sent after the second if the agent stays on the call for 2 minutes after the first script is submitted. If the call doesn't last that long, the third script isn't sent.
 To create an agent script:
- Create or edit the flow that you want to add an agent script to.
- Build the resource portion of your flow, including the Script objects. Use the bullets and image below to help you.

The following sample flow shows a built-out resource flow that has the script in parallel with the Conference Resource notation.
- Start with a Resource Entry event and connect it to a Work Offer object
- Connect the Work Offer object to a Parallel Branch, to identify that you are about to add multiple objects that should run concurrently
- From the Parallel Branch, connect both the Script and Conference Resource objects
- Connect both the Script and Conference Resource objects to another Parallel Branch to bring them together
- Connect the Parallel Branch to a Disconnect object
- Connect the Disconnect object to a Free Resource object, and then add an Exit event.
- Configure the flow objects as needed, deferring to the steps below for the Script object
-
Access the settings for the Script object. You may need to click on the object and select the gear icon to access the settings.
The script editor appears. - Enter the variable name for the resource that this script is presented to in the Resource field.
- Enter a variable name for this script in the Script Name field that can be referenced in a flow condition or reporting. Variable names can only contain lower case letters land dashes, no spaces or special characters. For example, script-name.
- Optionally, select the option to Automatically dismiss without warning. If this option is selected, an open script will automatically submit and dismiss itself when the interaction ends.
- Optionally, select Automatically submit after timeout. If this option is selected, the script is submitted after the configured amount of time even if it is incomplete. By default, the timeout is configured for 60 seconds.
To configure the timeout, select the unit of time (Seconds, Minutes, or Hours). In the text field that follows, enter an integer greater than zero or an variable that renders as an integer for the time value.
The Automatically submit after timeout option automatically submits itself after a specific amount of time. The Automatically dismiss without warning option automatically submits itself when the agent leaves the interaction.
The Automatically submit after timeout timer is disabled when wrap-up starts.
You can enable the Automatically submit after timeout and Automatically dismiss without warning options in the same Script.
If Script Reporting is enabled, the current values at the time of auto-submission for the Freeform Input, Dropdown, Scale and Checkbox types of script components are available to the flow and historical reporting.
- Optionally, click the check box to enable Script Reporting. If this option is selected, submitted scripts can be reported on in custom or standard script reports.
- Drag and drop the script component(s) that you want to use from the palette into the script editor.
A line item will appear with placeholder text for that component.You can add and configure components one at a time, or add them all and then individually configure.
- Click on the pencil icon (
 ) to the right of the placeholder text to access the configurable parameters for an item.
 - Enter the configuration details for that script item.
Detailed instructions to help you configure each of the script component types are included in the following section. - Click the X on the palette window to close it and return to the full editor.
You can click the pencil icon to edit any component at any time while in the script editor, or click the X to remove any components.
- If necessary, you can change the order of any component by clicking on the drag icon (
 ) next to each component and dragging it to the desired location in the list of components.
 - Click anywhere outside of the script editor to close it and return to the Flow Designer.
- When you're ready, publish your flow.
When an agent receives a call from this flow, the entire script will be displayed in the Agent Toolbar.
Configuring Script Component Parameters
Each of the script component types have parameter values that you need to configure to display the information that you want included in the agent script. Refer to each type below for specific instructions.
The text option presents information to agents, or a script that agents read to callers. There is no option to collect any data or to retrieve a response.
Name: Enter a variable name for this script item that can be referenced in a flow condition or reporting. Variable names can only contain lower case letters and dashes, no spaces or special characters. For example, script-component-name.
Description: Optionally, enter a description for this piece of text.
Text: Enter the text that you want to appear to the agent, exactly how it should be displayed. You can make the box larger by dragging the bottom right corner of the text box out.
Description: Optionally, enter a description for this piece of text.
Text: Enter the text that you want to appear to the agent. You can make the box larger by dragging the bottom right corner of the text box out. When this text is displayed to the agent, it will be followed by an empty text box for their free form response can be entered.
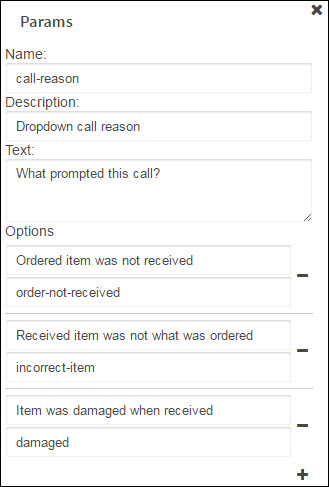
Description: Optionally, enter a description for this drop down menu.
Text: Enter the text that you want to appear to the agent. You can make the box larger by dragging the bottom right corner of the text box out. When this text is displayed to the agent, it will be followed by a drop down menu that displays the available options created below.
Options: Click the + symbol for each of the drop down menu options that you want to add. You can continue to add items by clicking +, or remove items by clicking -.
- In the first box, enter the drop down menu item as you want it to appear to the agent
- In the second box, enter the variable name for this drop down menu item
You can continue to add items by clicking +. You can remove any unnecessary items by clicking on the corresponding -.
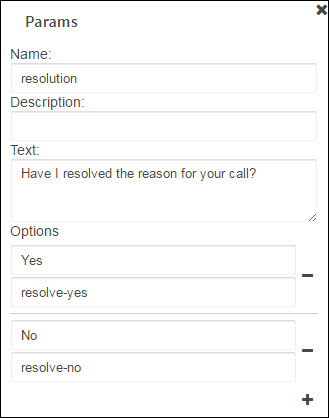
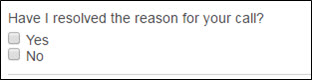
Example:
Parameters:
Outcome:

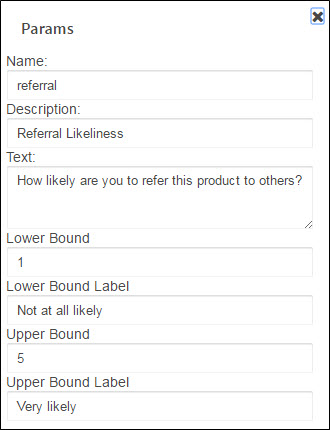
Description: Optionally, enter a description for this scale rating.
Text: Enter the text that you want to appear to the agent. You can make the box larger by dragging the bottom right corner of the text box out. When this text is displayed to the agent, it will be followed by a sequence of numbered radio buttons ranging from a lower bound number to a higher bound number.
Lower Bound: Enter the smallest numerical value that you want to begin your scale with. This number will be on the left most side of the scale.
Lower Bound Label: Enter the text that you want to display by the lowest end of the scale.
Upper Bound: Enter the largest numerical value that you want to end your scale with. This number will be on the right most side of the scale.
Upper Bound Label: Enter the text that you want to display by the highest end of the scale.
Example
Parameters:
Outcome:

Description: Optionally, enter a description for this image.
Text: Optionally, enter the text that you want to appear above the selected image.
Image source: Enter the complete URL of the image location.
Description: Optionally, enter a description for this checkbox selection.
Text: Enter the text that you want to appear to the agent. You can make the box larger by dragging the bottom right corner of the text box out. When this text is displayed to the agent, it will be followed by labeled boxes for the agent to select from.
Options: Click the + symbol for each of the check box response options that you want to add. You can continue to add items by clicking +, or remove items by clicking -.
- In the first box, enter the check box name as you want it to appear to the agent
- In the second box, enter the variable name for this response selection
Example
Parameters:
Outcome:
Description: Optionally, enter a description for this link.
Text: Optionally, enter text that you want to appear to an agent above the link.
Link address: Enter the complete URL for the site that you want the link to point to.
Use the iFrame option to present external or third-party content to an agent.
Please note that iFrame script widgets are only available for the suite of products. Agent Toolbar users will see their script excluding the iFrame component.
Name: Enter a variable name for this script item that can be referenced in a flow condition or reporting. Variable names can only contain lower case letters and dashes, no spaces or special characters. For example, script-component-name.
Description: Optionally, enter a brief description for this iFrame item.
Text: Optionally, enter any placeholder text to appear to the agent above the iFrame widget.
HTML source address: Enter the URL for the embedded content that you want displayed to the agent.
Height (in pixels): Optionally, specify the height of the iFrame window widget.
Width (in pixels): Optionally, specify the width of the iFrame window widget.
